It so happened that I like to take pictures of the Moon and the planets more – an interesting dynamics, quick and easy getting results. On the lunar-planetary capturing I have already written several instructions. Recently tried shooting planetary nebulae. These are small, bright and compact objects. Moreover, the surface brightness of some of these nebulae can be so high that even in a small telescope a greenish glow is noticeable.
For the selection and stacking of frames, I have long been using the program Autostakkert. Initially, it is designed to work with lunar-planetary videos. However, Autostakkert does very well with nebula / cluster videos. Over time, the author of the program added the ability to calibrate (loading a dark / flat frame).
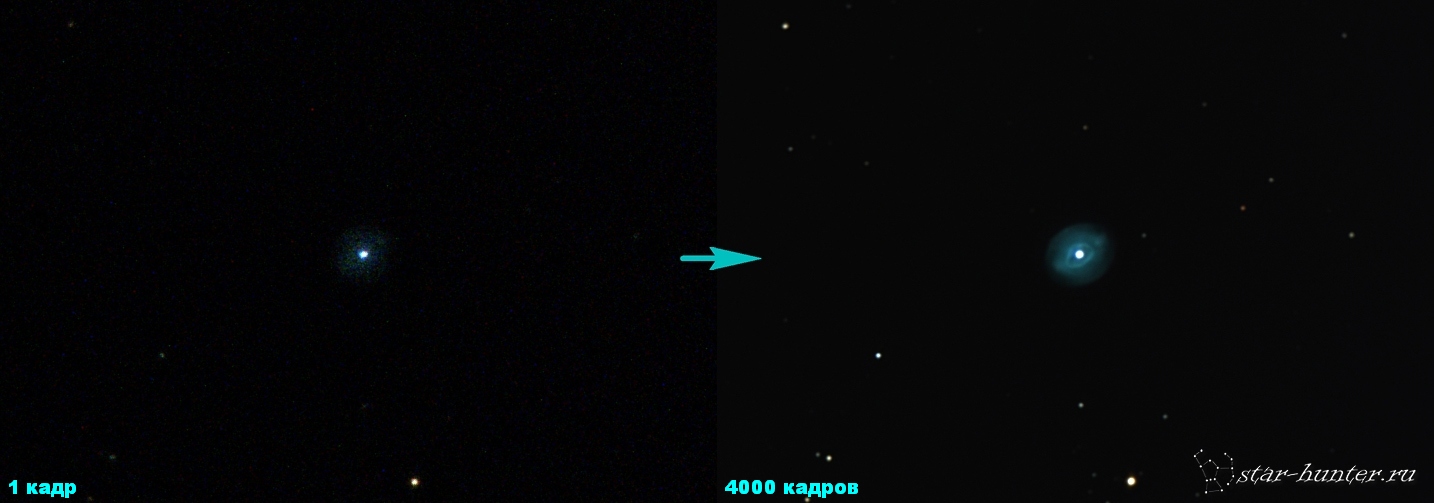
In the video below, I will show from start to finish the process of processing the video of the planetary nebula NGC 6826 “Blinking.” This is a very bright nebula – when shooting, the shutter speed was only 0.5 s, that is, 2 frames per second were recorded. The video is partially cropped (long stages of addition and alignment). Using this technique, you can also process the video of clusters, nebulae, and galaxies.
Equipment: Celestron NexStar 8 SE telescope, Sky-Watcher EQ5 mount with motors, ZWO IR-cut filter, ZWO 224 MC camera (500 ms, gain 533, gamma 40). The video was recorded using the FireCapture program, the recording format is SER, it can be opened by the SER-player. A video with dark frames was also recorded – without it, color spots and bright thermal illumination from the right and bottom edges of the frame become noticeable in the final image. For a start, you can practice without shooting dark, but their use is highly desirable.
The processing steps are as follows.
1. From the clip with dark frames we create one dark frame (the so-called masterdark) in the Autostakkert program.
2. Then open the nebula clip in Autostakkert. We load the masterdark received earlier. We make alignment and sorting of frames by quality, indicate addition points, number of frames, and start the addition process. Also masterdark can be loaded after leveling and sorting.
3. The final result of the addition in the form of a single blurred frame is opened in the Fitswork program – we adjust the levels, if necessary, level the background, save.
4. Add sharpness with wavelets (Registax 6) or deconvolution (Astra Image).
5. Crop and save the picture.
Здравствуйте. Скажите пожалуйста, почему Вы предпочли сделать выравнивание кадров в Autostakkert а не в PIPP. И ещё вопрос, почему Вы вейвлеты использовали в Registax, ведь они есть и в Astra Image? Можно было бы сразу перейти после Fitswork в Astra Image и там использовать вейвлеты и сразу там же и деконволюцию. Или в Registax вейвлеты более качественно обрабатывают изображение?
Заранее спасибо.
Здравствкуйте. PIPP лучше работает по планетам.
Вейвлеты есть в разных программах, но работают они все по-разному. Могу посоветовать еще Astrosurface.
Спасибо.