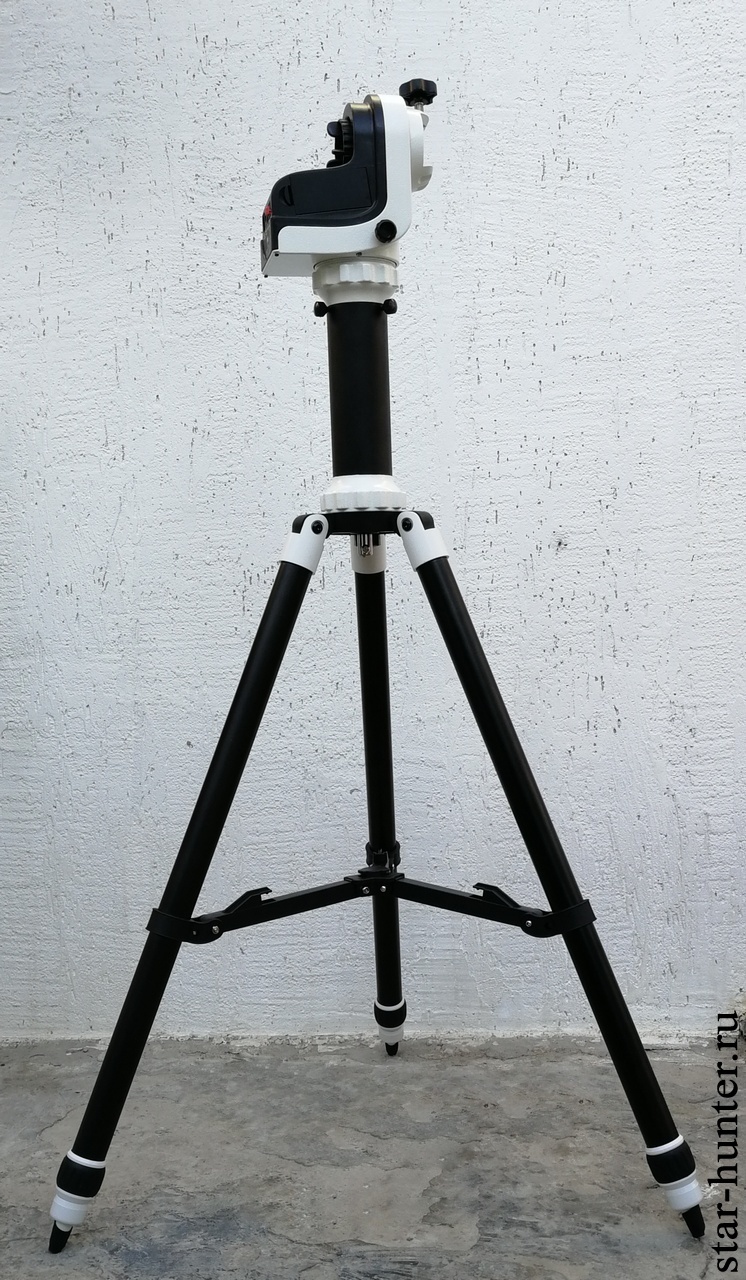
I recently became the owner of an interesting Sky-Watcher AZ-GTi mount on a Star Adventurer tripod. With a mount weight of only 1.3 kg, its maximum load capacity is 5 kg. The mount is equipped with dual encoders, that is, after alignment to the object, the mount can be rotated by hand, but the alignment will not be lost. The mount is controlled via Wi-Fi using the SynScan Pro application from a smartphone tablet (Android, iOS) or from Windows PC. You can connect a Synscan hardware remote control to the mount by pre-crimping the cable in a specific pinout. Sky-Watcher AZ-GTi is suitable for both beginners and advanced astronomy enthusiasts who need a multifunctional azimuth mount mount with built-in motors, Go-To, Wi-Fi and the ability to work in equatorial mode.
General
A mount is a device designed to guide a telescope tube to an object. In most cases, the mount is a part of the telescope between the tripod and the optical tube. In alt-azimuth mounts, aiming is carried out in azimuth and height (left-right, up-down), in equatorial mounts – in right ascension and declination. The azimuthal mount can be converted to the equatorial, by directing its axis of heights to the pole of the world. In this case, azimuth becomes right ascension, and latitude becomes declination. For tilting, a special device is usually used – the equatorial wedge. There are also motorized mounts with compensation for Earth rotation. In this case, the object does not escape from the field of view and it can be examined in detail, which is especially important in observations with high magnification.
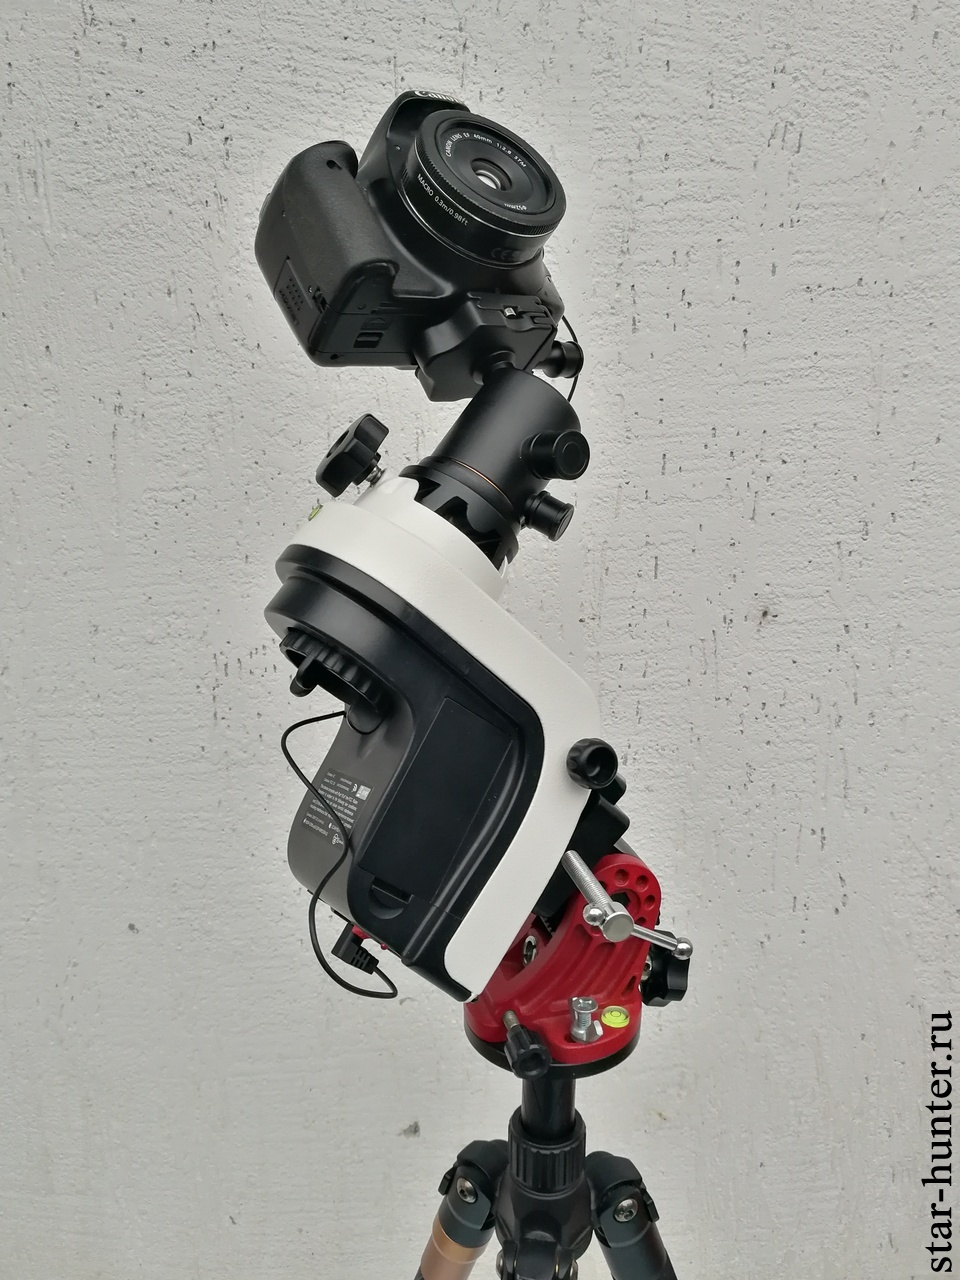
Initially, the Sky-Watcher AZ-GTi mount was positioned by the manufacturer as azimuthal, but the developers released firmware for it with the addition of the equatorial mode, as well as the location of the mounting plate on the right (Firmware: AZGTi Mount, Right Arm, AZ / EQ Dual Mode). This significantly raised the interest in mounting among astrophotographers. You can update the firmware via Wi-Fi. Due to its small size, the mount can also be used as a mini-tracker.
The manufacturer himself warns that the mount was not intended for astrophotography, the updated firmware was made for advanced users, the efficiency in astrophotography is not guaranteed, and, as a rule, the user may encounter difficulties in obtaining the expected result.

Manufacturer’s specification:
Controller: Free SynScan App for iOS and Android mobile device or Synscan Hand Controller (available separately)
SynScan App Database: Total 10,000+ Objects. Deep Sky Objects: 10759, including Messier, NGC, IC, Caldwell Catalogues, Named DSOs, Named Stars: 305, Double Stars: 55, Solar system objects: 7 planets, Sun , Moon. (Unlimited objects when working with a 3rd party planetarium software).
SynScan App Alignment Method: Brightest Star Alignment, North-Level Alignment
SynScan App’s Other Features: Tonight’s Best Sky Tour, Point and Go with a mobile device, Identification of Celestial Objects, Remote control over Internet, User defined objects, Pointing Accuracy Enhancement (PAE)
Pointing Accuracy: Up to 10 arc-minute (RMS)
Resolution: 2073600 Counts/Rev., 0.625 arc-second
Resolution of Aux. R.A./Dec. Axis Encoders: 1068 Counts/Rev., approx. 20 arc-minutes
Tracking Technology: Freedom-Find™ Dual-Encoder
Tracking Rates: Sidereal, Lunar, Solar, Alignment-Free Solar Tracking
Slewing Speeds: 0.5X, 1.0x, 8.0x, 16x, 32x, 64x, 128x, 400x, 800x
Tracking Mode: Dual Axis Tracking
Motor: DC Servo Motor, Gear Ratio 6480
Payload Capacity: 5kg
Saddle: Accepts 45mm Sky-Watcher/Vixen type dovetail
Interface: SynScan Hand Control Port, DSLR Shutter Release Port (optional cables available separately), Built-in Wi-Fi Module
Connectivity: ASCOM platform for Windows PC, Mobile planetarium App for iOS and Android ( SkySafari Plus/Pro, more are coming).
Network Protocol: UDP, Port 11880
Tripod/Mount Fitting: 3/8″ Screw Fitting
Tripod: Adjustable Aluminium with Accessory Tray
Height of Tripod/Mount (excl. OTA): 80.5cm – 152cm
Mount Head Weight: 1.3kg
Total Weight with Tripod: 3.9kg
Power Requirement: 8 AA Size Batteries (not supplied) or External Power Supply (DC 7.5~14V, 0.75A) Tip Positive.
Appearance, equipment
The mount is delivered in a large cardboard box with dimensions 116.0 × 23.5 × 25.0 cm and a weight of 6 kg.
Options:
– mount head
– aluminum tripod
– extension tube for installing telephoto telescopes (column)
– tray for accessories (shelf)
– cable for SNAP port (for Canon cameras)

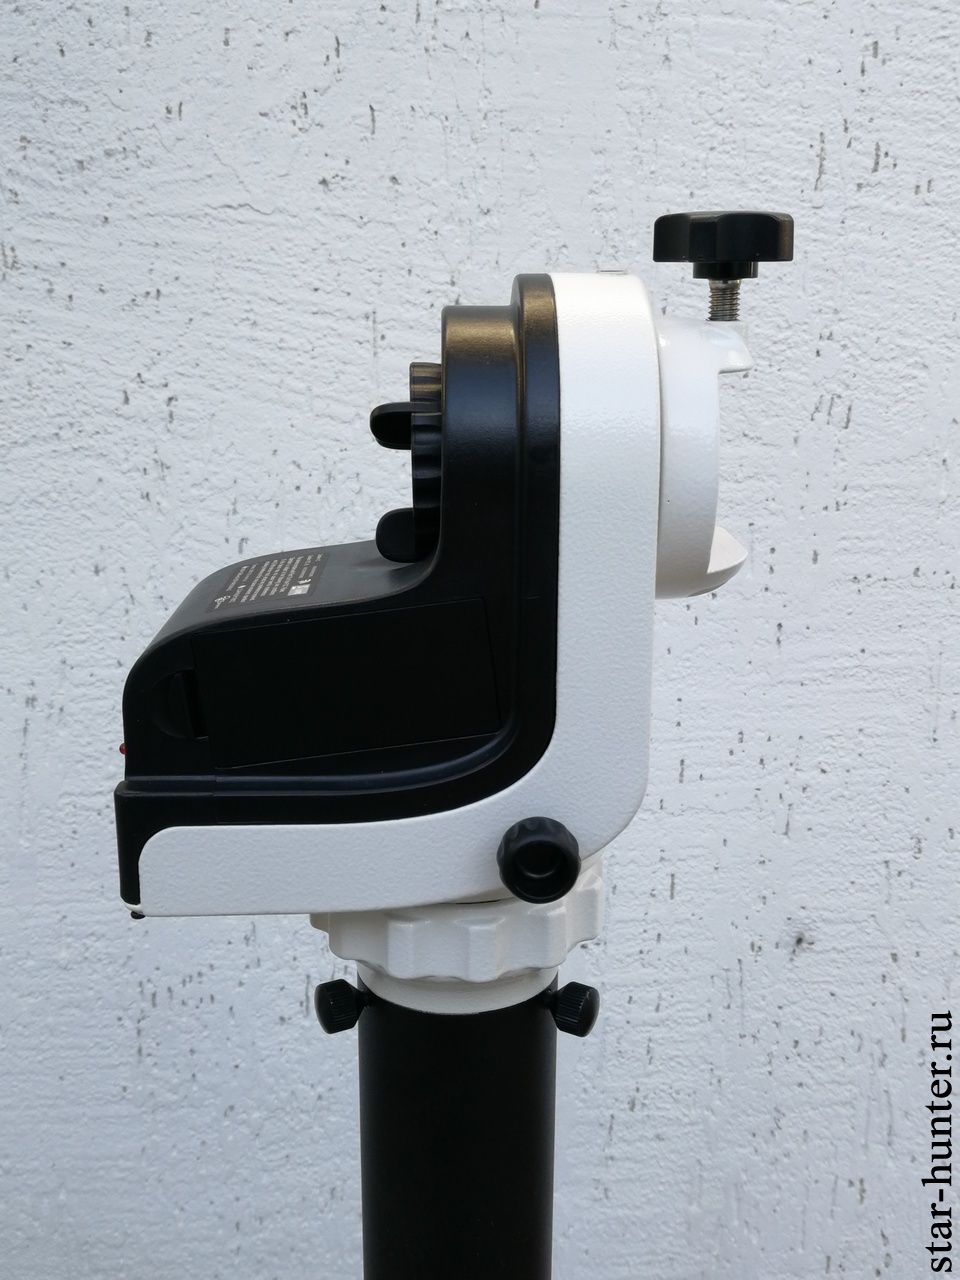
The mount is very light and compact. The weight of the mount head without batteries 1.28 kg, with 8 AA batteries Panasonic Eneloop 2450 – 1.56 kg. Length width height in cm – 17 x 11 x 16. In the lower part there is a thread for a photo bolt 3 8 ” .
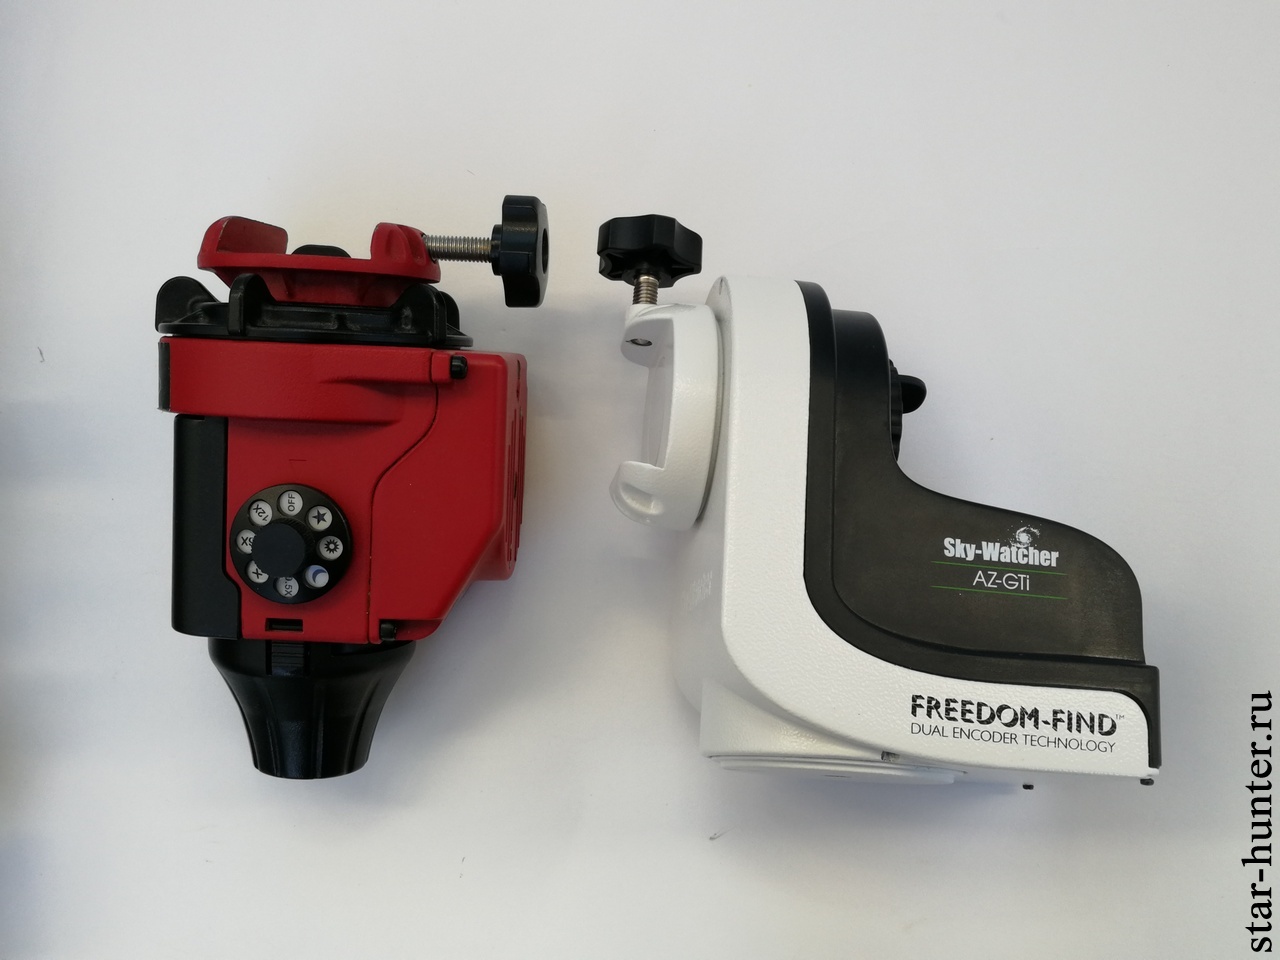
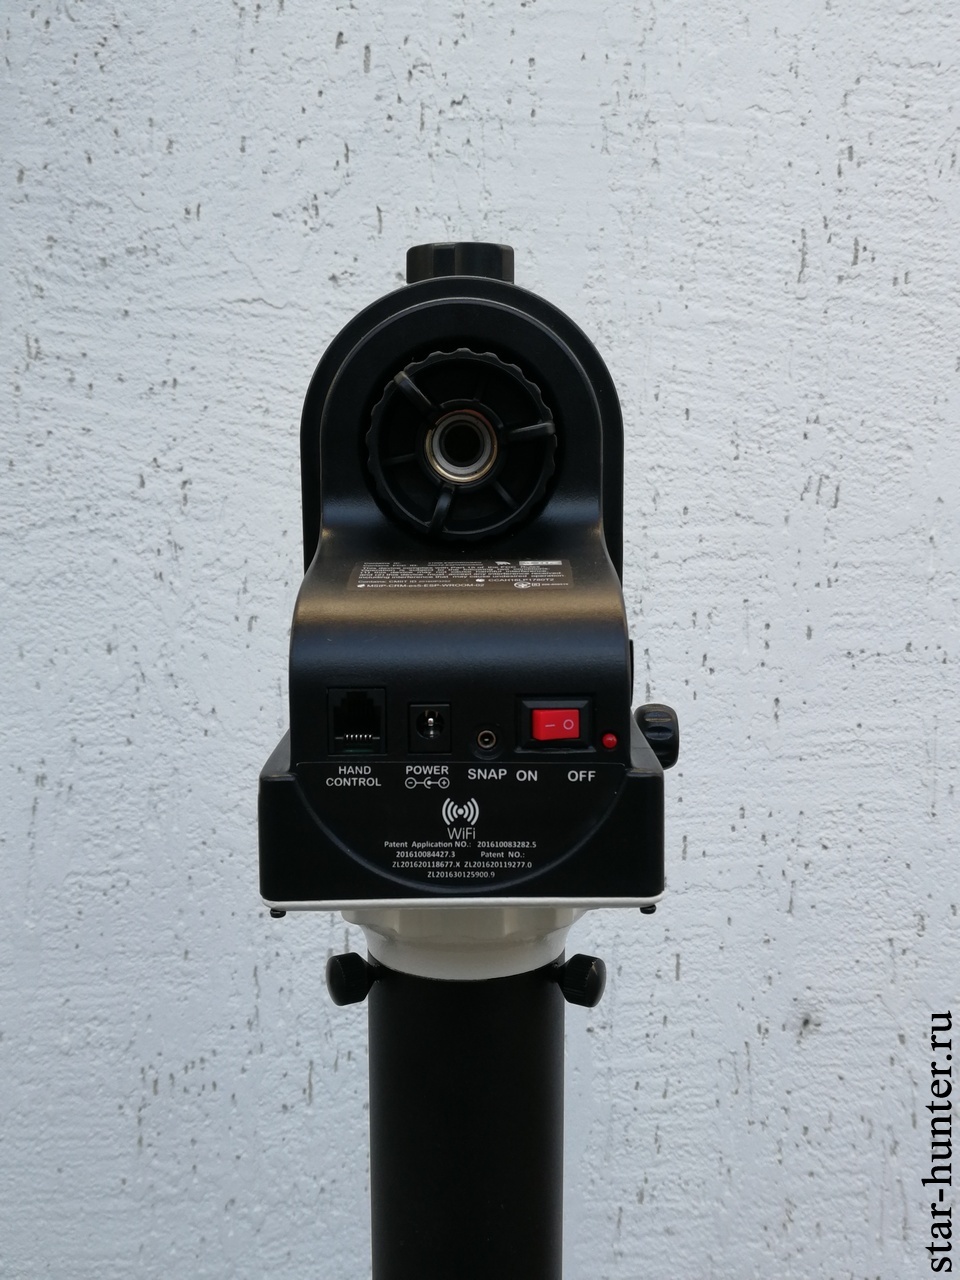
On the side of the case there is a knob for adjusting the axis clamp in azimuth. In the upper part on the side there is a height adjustment wheel with a hole for the counterweight axis with M12 thread. On the same side in a row are the connectors for the remote, power, camera control, power button and status LED. The white part of the mount is metal, the black part is plastic. The workmanship is good, it does not play anything, does not hang out and does not rattle. I just can’t believe that two motors, encoders, Wi-Fi were pushed into such a baby right away, and there was still room for batteries. It looks nice and neat. I did not disassemble the mount, but judging by the pictures from the cloudynigths forum, everything is also neat inside.

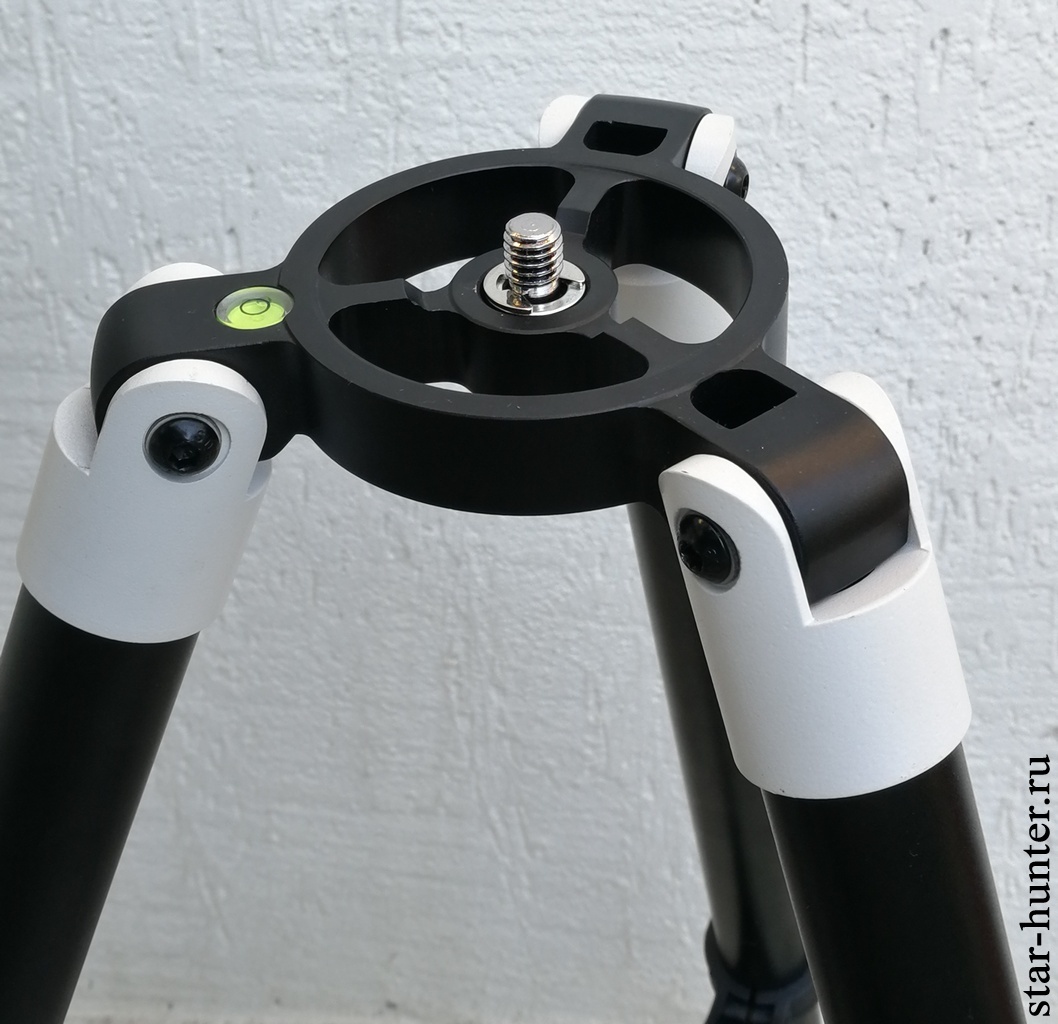
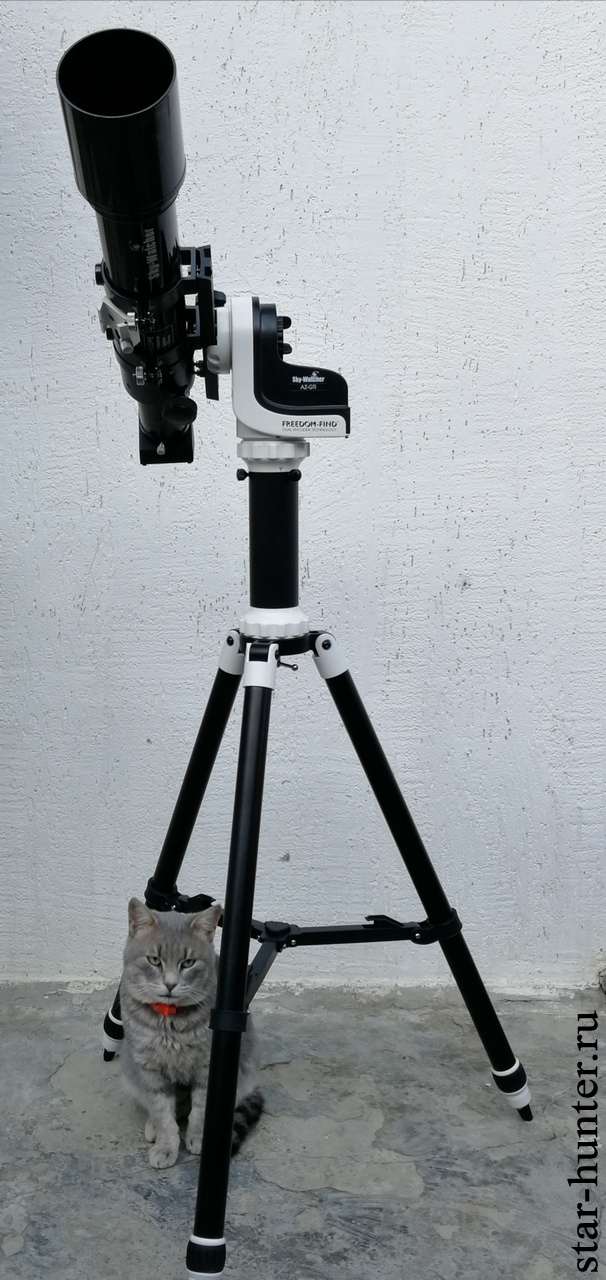
Metal tubular tripod. The total assembly weight is 3.9 kg. By loosening the collet, you can enlarge the length of the tripod. The height of the mount can be adjusted from 80 to 152 cm. The tripod extensions are made of plastic, while loosening the collet, hold the leg with your other hand. With extensions marks should be handled more carefully.



Features
In azimuth mode, the Sky-Watcher AZ-GTi mount is suitable for visual observations and lunar-planet astrophotography. However, field rotation hinders capturing with long exposition in the AZ mode – azimuthal mount effect, in which all the stars in the image rotate around the center of the field of view. To eliminate field rotation, it is necessary to use a rare or expensive derotator (a device that slowly rotates the camera around an axis), or an inexpensive equatorial wedge (which transfers the mount to EQ mode). It is easier and cheaper to use the Sky-Watcher equatorial wedge, with which the Sky-Watcher AZ-GTi mount is almost completely compatible. The only caveat – it is necessary to replace the clamping screw on the wedge with another (with a thin handle), a screw bolt or a folding bolt, otherwise the mount head will cling to it. Also you can try wedge from iOptron – there is no problem with screw.
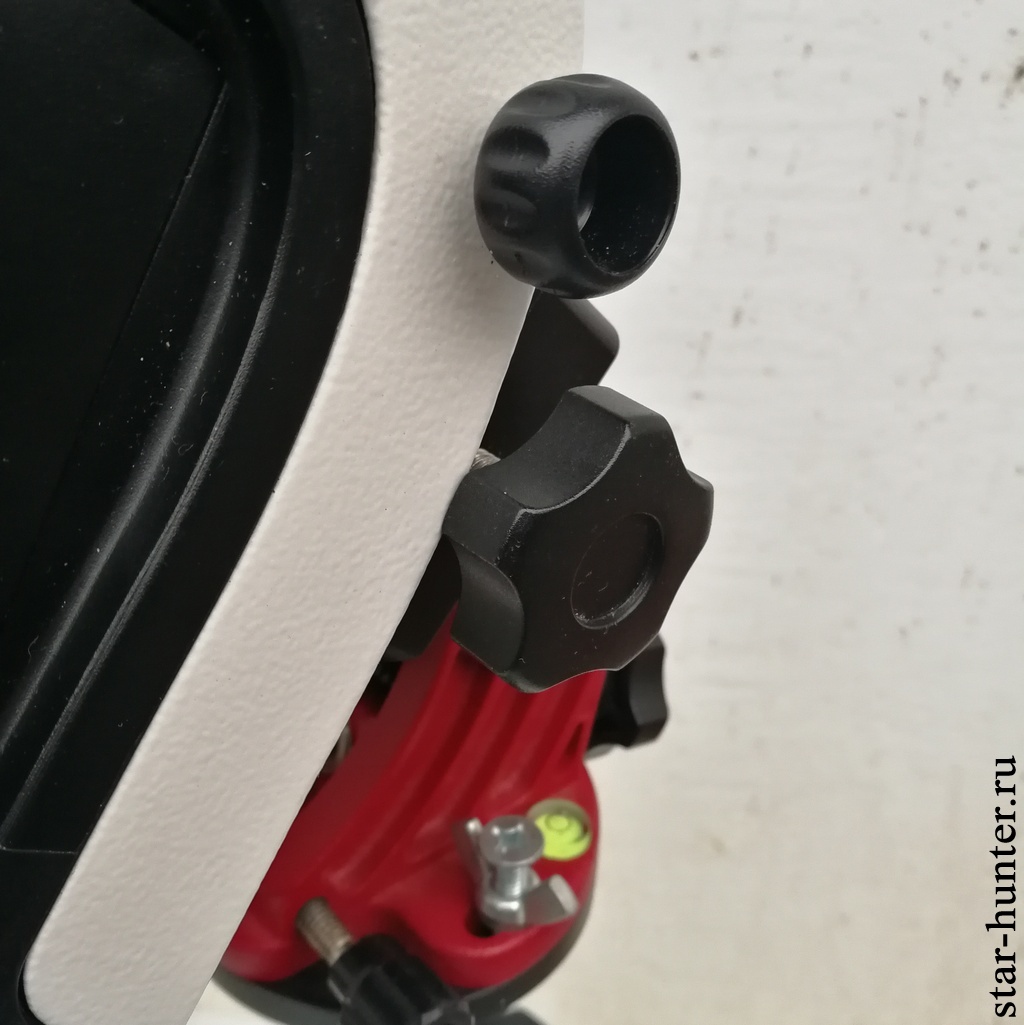

A polar finder is not provided for this mount. For azimuthal mounting it is not needed, however, in the equatorial mode, installing the polar axis without a finder turns into a rather complicated task. There are several ways to solve it.
1. The first method is to use the built-in polar axis settings through the SynScan Pro application or the remote control. To do this, bind to 2 or 3 stars, find in the remote control menu “Calibrate polar settings”. Next, the mount will be guided several times on the reference star with a proposal to adjust the height and azimuth of the polar axis. Through several repetitions, it is possible to achieve the accuracy of setting the polar axis of about 1 minute of the arc. I have not tried this method yet, but I will definitely try.
2. The second method – an astro camera with a CCTV lens (focal length from 25 mm) and the SharpCap application version 2.9 act as a pole finder. The camera with the lens can be mounted on the telescope body, on the dovetail or on a special holder. In the process of setting up, it is necessary to point the camera at the North Star and turn the mount on the Ra axis 90 degrees. The application will indicate in which direction to turn the screws on the equatorial wedge so that the mount looks exactly at the pole of the world. Repeat if necessary. The method is very simple and fast, but it requires a computer.
3. The third method is an optical pole finder + special mount. However, the mount axis and the finder may not match.
I use the second method, but if the polar star is unavailable, I will try to use the first one.
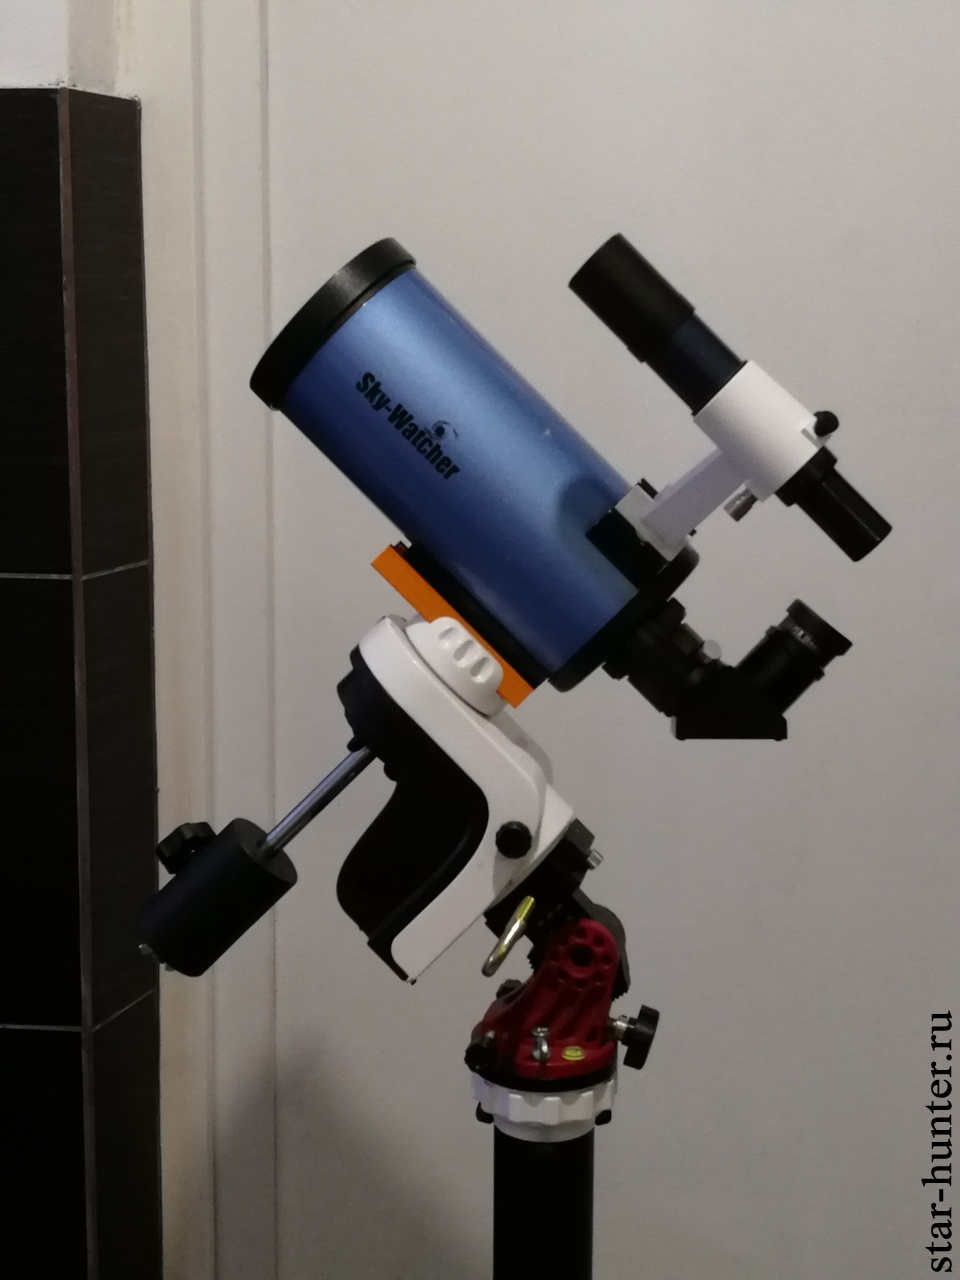
You can also attach an axis and a counterweight to the mount – they are suitable from the mount of Sky-Watcher EQ1 with M12 thread. This is necessary for the equatorial mode. In azimuth mode, the counterweight can be omitted.
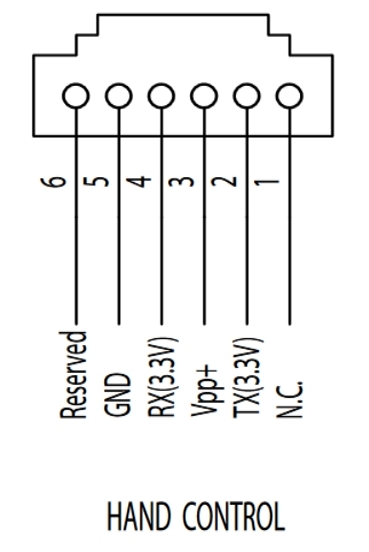
ATTENTION! When using the Synscan hardware console, the pinout is different from the standard! It is necessary to crimp the cable according to the following diagram, otherwise the mount electronics may be damaged. Be careful!
SynScan Pro app
The SynScan Pro application is used to control the mount. I really liked it – intuitive, with many settings, and in russian/english language. It is free and contains more than 10,000 celestial objects, including planets, the Sun, the Moon. There are catalogs Messier, NGC, IC, Caldwell, double stars, as well as stars with names.
However, there are several nuances.
1. On devices with on-screen navigation buttons, the application does not start in full screen mode. This creates certain inconveniences when trying to use the telescope control buttons “blindly”, that is, without looking at the phone. I wrote to the developers of the application with a recommendation to add full-screen mode, however, I was advised in the settings to simply push the buttons up. As a result, I rummaged a bit in the phone settings and found a forced hide of the navigation buttons.
2. In order to the solar alignment, it is necessary to activate the corresponding item in the settings and solve the captcha (summing a pair of two-digit numbers). Moreover, the next day, the settings are reset and to activate the solar reference you need to go back to the menu and solve the example. For me personally, this is very inconvenient, because I try to observe and shoot the Sun every clear day. Application developers responded that “Sorry, we have to keep the solar observering enabled / disabled feature for the safety of our customer and ourselves. Some of our customers are not professionals”.
The SynScan Pro for Windows application is completely similar to the application on a mobile device, with the difference that the location must be specified manually.

Testing
I use 8 Panasonic Eneloop 2450 batteries to power the mount. There is a battery compartment on the side of the mount. You can also use a 12 V power supply unit, or Powerbank with a 12 V output. It should be noted that in standby mode, the mount consumes very low current, so the external powerbank must be low current mode, and not all external batteries will work with the mount. Before buying a powerbank, check the operation in conjunction with the mount.
Before use, the mount should be aligned to a small bubble level in the upper part of the housing. With standard firmware, the optical tube should be on the left side of the mount. After firmware flashing to AZEQ mode, the optical tube should be on the right. Before tying the mount in azimuth mode, it is necessary to set the tub in a horizontal position, and also point it to the south (if it is without updating the firmware, it should be directed to the north). It is not necessary to indicate the time and coordinates of the place of observation – the mount will take them from the phone itself. Then tighten the locking screws on the mount. After switching on in azimuth mode, an alignment should be made. We select the object from SynScan Pro app, the telescope will hover in the approximate area of the object. Next, by clicking the arrows in the application, we move the object into the center of the field of view and confirm the alignment.
The initial position when working in the equatorial mode is different
-the axis of direct ascent is directed to the North Pole of the world (in the Northern Hemisphere) or to the South pole (in the Southern Hemisphere)
– the counterweight bar should look down – the telescope is pointing to the North pole of the world (in the Northern Hemisphere) or to the South Pole (in the Southern Hemisphere).
In the simplest case, if you want to observe only the Moon or a known planet, you can make alignment on them. That is, they turned on the telescope, made an alignment on the Moon and observe it. However, it will be more accurate to alignment on two or three stars. In addition, in the process of observation, you can make additional alignment to the already observed objects, due to which the accuracy of Go-To will be even higher. The alignment is very simple and intuitive – even a beginner can easily cope with it. I recommend that you pre-install any starry sky map on your phone for orientation by constellations and bright stars.
As for accuracy, when I first used it in azimuth mode, I made an alignment by the Moon. Next, I suggested the mount to aim at Saturn (angular distance of about 80 degrees). To my surprise, the planet immediately came into view of the eyepiece at a magnification of 125x. Fine!
At maximum speed, the mount is quite noisy. A buzzing and rattling sound is heard. The sound along the axis of heights is uniform, along the azimuth – with periodic changes in tone. At stellar speed, the mount makes almost no sounds. The mount uses DC drives.
I really liked the ability to activate alighnment-free star tracking. In the SynScan Pro application, you can select the siderial or lunar speed of rotation of the mount. That is, it is enough to set the polar axis, turn on the tracking, and you can start observing / shooting. However, after binding, it becomes possible to automatically aim at the object, which will save time. In general, everyone can use the mount for the desired scenario.
As mentioned earlier, when the axle retaining screws are loosened, the mount can be rotated by hand. At the same time, a noticeable effort is required – the mount will not rotate from a light touch of the finger on the optical tube, and at rest the mount will seem to “stick”. Most likely, such a tight rotation is necessary to reduce backlash. That is, it is not comfortable to observe with manual operation without control from the remote control. In my opinion, this function is useful for manually pointing to an object with subsequent correction by additional correction from the remote control or application.
If you activate additional encoders in the application settings, then after pointing with your hands, the binding will not be lost. To improve the accuracy of Go-To, the manufacturer recommends disabling additional encoders.
I really liked the load capacity of the mount. She can easily carry telescopes weighing up to 3-4 kilograms. With a maximum load of 5 kg, the mount copes well. I used several telescopes on it – Schmidt-Cassegrain Celestron Omni XLT 127, newton Sky-Watcher BKP1145, refractor Sky-Watcher BK705 – all without any problems. Of course, there is shaking from the touch, but it fades quickly.
The Star Adventurer tripod is very lightweight, compact, and fairly stable. Its rigidity is quite enough for visual observations, lunar & planetary astrophotography, as well as shooting with long expositions through a short-focus astrograph (focus up to 500 mm), for example, Sky-Watcher 72ED. If desired, you can replace the tripod with a stronger one – this will positively affect stability and sustainability. Also, the mount head can be mounted on a durable tripod – you get a transportable option for travel.
I also tested the SNAP connector with a Canon 550D SLR camera. Through the SynScan Pro application, you can activate interval shooting with the option of manual shutter speed (Bulb), which allows you to control the camera shooting remotely.
Astrophotography
Thanks to the built-in motors, the Sky-Watcher AZ-GTi can be successfully used for lunar-planetary capturing. After alignment, it will accurately track a celestial object, allowing you to take a picture or record a video. When shooting in azimuth mode due to field rotation, there are restrictions on the duration of the capturing. When shooting the Moon, planets and the Sun, it is about 2 minutes, when shooting with long exposures (nebulae, galaxies, clusters) – about 30 seconds. When using the equatorial wedge, the Moon, the Sun, Mercury, Venus, Uranus and Neptune can be shot much longer, but planets with fast rotation (Jupiter, Saturn, Mars) will still have to be captured for no more than two minutes. Below are some pictures that I took using telescopes mounted on a Sky-Watcher AZ-GTi mount.


The maximum shutter speed depends on a number of factors, namely: weight and windage of the telescope/lens, tripod stiffness, capturing scale (angular seconds per pixel), accuracy of the polar axis setting and the using of autoguiding.
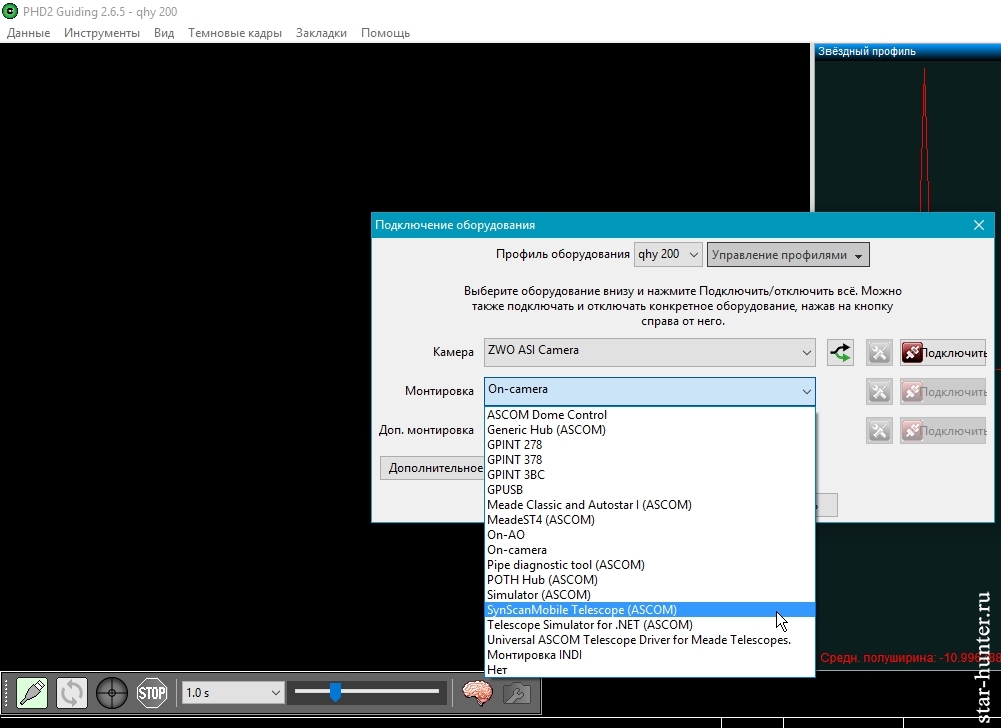
There is no ST4 auto-guide port on the Sky-Watcher AZ-GTi mount, however this is not a problem, since after installing the SynScan App ASCOM driver on the computer, the mount can guide via Wi-Fi. It also allows using astrocams for guiding without an auto guide port. In the guiding program (for example, PHD2), select “SynScanMobile Telescope (ASCOM)” in the mount list. Before starting guiding, you need to download and run the SynScan Pro application for your computer.
For autoguiding I use the Sky-Watcher 8×50 finder and the QHY5III178m camera. When calibrating the guide, it turned out that there is a big backlash along the DEC axis – the program refused to calibrate. On the RA axis, the play is noticeably less, but there is one. So far, managed to configure guiding on only one axis (Ra). I will also try to adjust the backlash compensation in the settings of the SynScan app.
Later, I tried to take sky shots using the Samyang 135 2.0 ED photo lens (focal length 135 mm), the Svbony CLS clip EOS-C filter and the Canon 550D camera (pixel size 4.3 microns). I made the installation of the polar axis using the SharpCap application, the QHY5III178m camera and the 25 1.4 CCTV lens. The shooting time was 47 minutes with shutter speeds of 1 minute – 47 frames were obtained.

13 frames were defective (28%). Below is an animation of moving stars on a small fragment of the frame. You can see how the star “walks” left and right. The upward shift is due to the not entirely accurate installation of the polar axis.
Autoguiding can significantly reduce the percentage of defective frames, compensate for periodic errors and inaccuracies in the installation of the polar axis, thereby maximizing shutter speed can be increased. This requires additional testing, I will write about this when using the mount further. However, judging by the numerous images of other astrophotographers, with a Sky-Watcher AZ-GTi mount and 72 mm apochromat, in the presence of guiding, shutter speeds of up to 500-600 seconds can be achieved. So the potential of the mount is very large.
Summary
I really liked the Sky-Watcher AZ-GTi mount because of its compactness, light weight, ease of setup and excellent functionality. For the money you get a modern motorized mount with the ability to wirelessly control. The mount works stably, there were no spontaneous outages and disconnections. The lifting capacity of the mount with its size and weight impressed even an experienced amateur astronomy. SynScan Pro application is intuitive and has many settings, it is easy to master even for a beginner. However, keep in mind that for astro photography with long exposures in the equatorial mode, you need to buy an equatorial wedge, an axis with a counterweight, and also a wedge bolt without protruding parts. A pole finder with pad or astro camera + CCTV lens is also very desirable for quick and accurate exposure of the polar axis.
Polar finder adapters: for optical polar finder and for electronic polar finder (CCTV lens + cam).
Additional materials:
Manual for Sky-Watcher AZ-GTi
SynScan Pro app: Android, iOS, Windows
Firmware
ASCOM-driver SynScan App
I also recommend that you read the manual for the SynScan hand control – the SynScan Pro application repeats its functionality in many ways.
